Showing posts with label tutorial. Show all posts

Wednesday, February 11, 2015

Easy Peasy Quesadillas (From Leftovers!)

Looking for something yummy to eat? If you have a couple flour tortillas, some cheese, and leftovers of some type, you can probably make one of my Easy Peasy Quesadillas.

Before we get started, a disclaimer: Certain types of leftovers may not be ideal for adding to quesadillas (soups or casseroles for example), but a cheese quesadilla and a cup of leftover chili sounds pretty good together!


For this recipe, I will be using Flour Tortillas (2 per quesadilla, or 1 per half-quesadilla), Cheese (as much or little as you like), leftover Taco Meat (or sausage, bacon, lunchmeat, chicken, or veggies), Onion, and Diced Jalapenos. You will also need a little oil or butter to grease the skillet.

Step 1: Grease your skillet.

Step 2: Add a flour tortilla and some cheese. You will want to work quickly from this point so that yor tortilla does not get over-browned on the bottom.
Step 3: Add your meat.

Step 4: Add any veggies or additional ingredients.

I have to say...this looks delicious!

Step 5: Add some more cheese on top- this will make the two tortillas stick together when you have so many toppings they want to fall apart. Yum!

Step 6: Add another flour tortilla to the top and press it down with your hand.

Step 7: Flip the whole thing over--you might need to hold that top tortilla on when doing this. I just do it very quickly and it (usually) works.


Step 8: Make another half because it looks so delicious! (Or because you have one odd tortilla).

These can be a little harder to get rolled over and flipped...be careful not to burn yourself! (Even though the bottom is cooked, it is a good idea to flip it to melt that fresh cheese you just put on top--or put cheese over the whole tortilla when you start--I'm known for doing things the hard way.)

Step 9: Cut into slices.

Step 10: Serve with sour cream and salsa (or guacamole and fresh pico de gallo).

(Step 11:) Devour.

I hope you enjoy this recipe. Did you try it? Do you ever put "strange" things on your quesadillas like peanut butter and pickles? Share with all of us in the comments.

Tuesday, July 1, 2014

Time Savers: Bakin' yer Bacon


I can bring home the bacon...I can fry the bacon...I even know how to save my own bacon (usually), but baking bacon? That just sounds unnatural, so of course I had to give it a try. Here is what I learned, and a step by step tutorial on doing it yourself.
 
Step 1: Set oven to 350 degrees 
 
Step 2: Cut entire slab of bacon in half with kitchen shears. I use kitchen shears because I can cut through the whole slab much easier than with a knife.
 
Cutting your bacon in half is not strictly necessary, but I wanted sandwich-sized bacon.
 

Step 3: Lay a sheet of parchment paper (if available) on a cookie sheet with edges (you don't want hot grease rolling off the sides into your oven.) Now lay out your bacon in whatever arrangement works best for your pan and your purposes. You can see I reuse my paper until I have all my bacon baked.

Step 4: Put your bacon in the preheated oven for 20-30 minutes depending on how crisp you like it. (Ok, so this is a picture of me taking it out, but doesn't it look yummy?)

Step 5: Use a spatula to move the cooked bacon to a paper-towel covered plate to drain.

Step 6: Yum! Drool a little...and then sneak a piece when no one is looking. From this point, you can devour all the yummy goodness or save some for later.

Step 7: We made a couple of sandwiches and put the rest (I cooked 2 lbs) into a Ziploc bag with another paper towel to catch any extra grease. Store it in the fridge, so it's available for sandwiches, bacon bits, a quick breakfast, or just to sneak a piece now and then.
 
Warning: You may need to hide the bacon or put it in a tub marked {insert something your family hates to eat}--to keep it from disappearing too quickly.

Step 8: Don't throw out that bacon grease! Save it for the next time you make eggs, fried potatoes, cornbread, or whatever else you might want to flavor with bacon grease. My grease jar today used to be a baby food jar, and it just barely holds the grease. Learn more about grease jars here.
 
Step 9: Throw out your parchment paper and put your clean pan back in the cupboard. Or, if you didn't have parchment paper, buy some for next time and then take dish soap and squirt a good amount on your pan. Use your hand to make sure the entire pan is covered, including corners. Let the pan sit for an hour or two and then wash off with a sponge.
 
Step 10: Tell all yer friend's about my "Bakin' yer Bacon" post so they can try it too!
 
Now, wasn't that easy? No more bacon splatters from skillet frying either!

Friday, November 15, 2013

Crochet Hats

No tutorial this time, just some pictures for inspiration. I do occasionally have these for sale. If you are interested, you can check out my Facebook page and send me a message.


Owl hats!


Cabbage Patch Doll hair hat!


Monster's Inc!


Penguin hat!


Monster hat!


Christmas Owl hat and scarf set.


Thomas the Train hat.

All of these hats were made by me mostly without a pattern...the one I did use a pattern on was Thomas, and I actually modified it so much it really doesn't count...I ended up only using the pattern for making the number 1 on the side of the hat.

I hope that you enjoyed the pictures and are inspired to make some of your own. I have a very limited selection of hats already made and ready to ship. I will try to get pictures on my Facebook page in the next day or so. 

Check out my link party page to see where I am linking.

Friday, November 8, 2013

Stacked Washer & Dryer Tutorial


I made this a few years ago, but am just now getting around to posting the tutorial. My daughter had one of those plastic washer/dryer things to play with, but it was not functional and took up a lot of room. I created this one with the intention of using it as a laundry basket as well. You could put a mesh bag on the inside for laundry if you chose to use it that way.


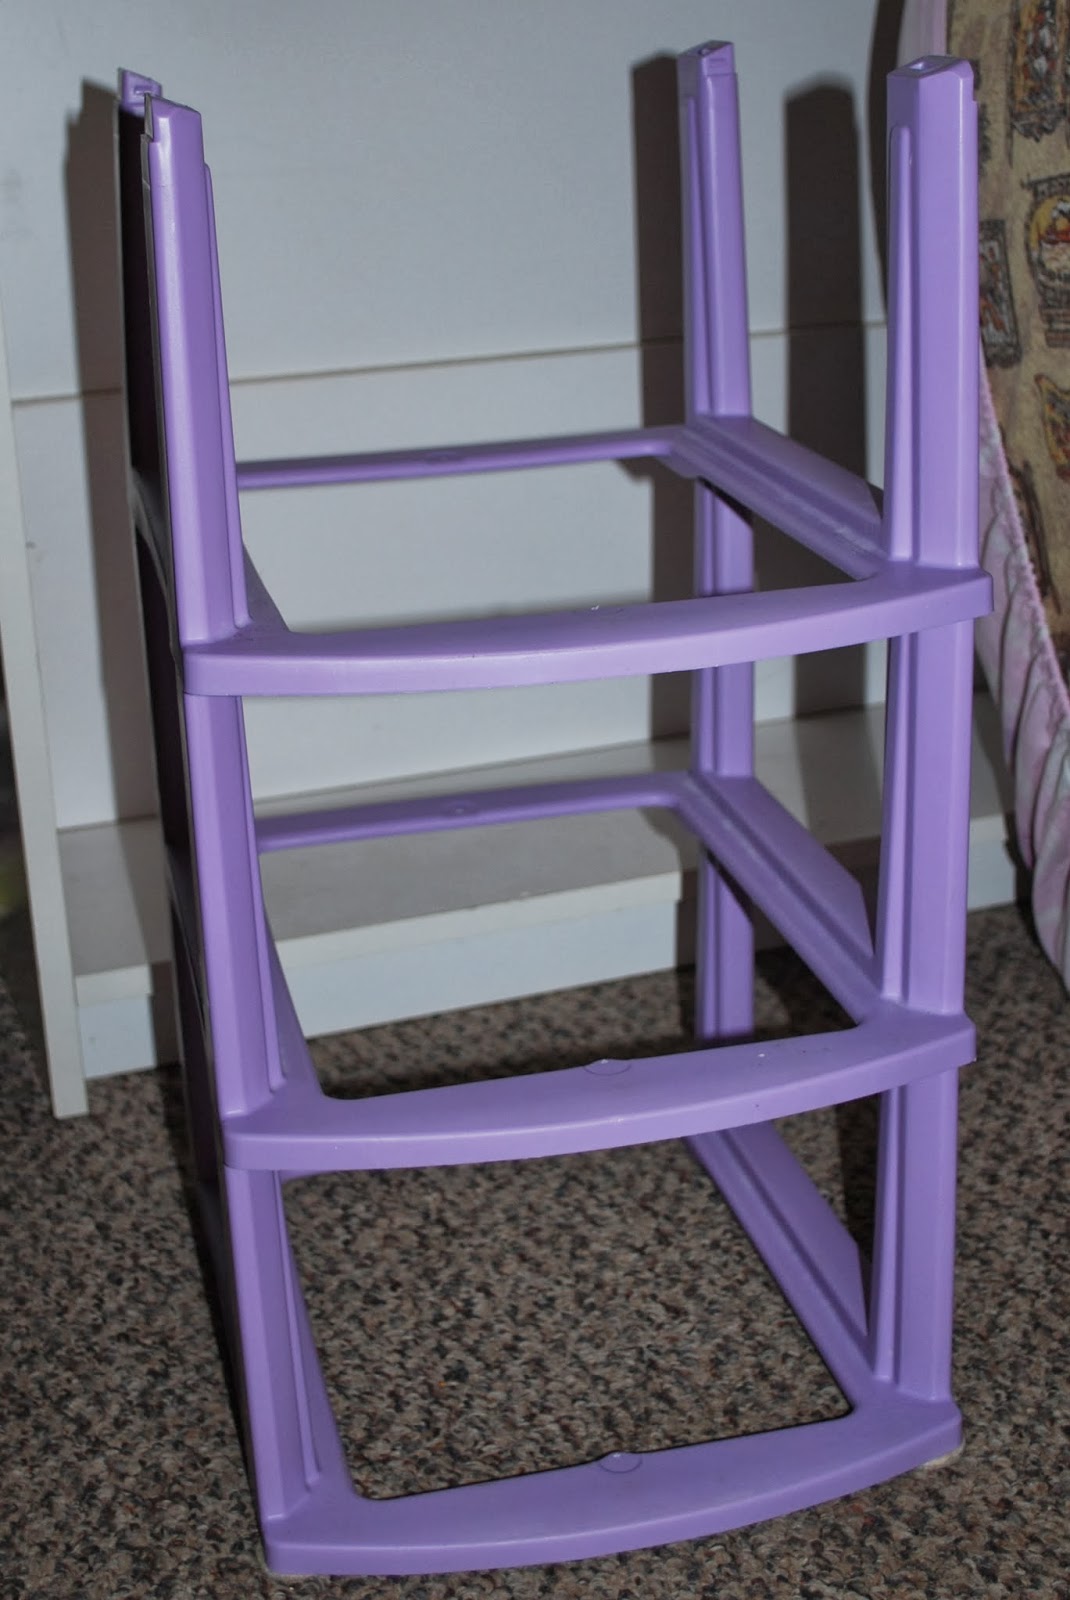
I started with this...one of those 3-drawer plastic things...minus the drawers. You could also use PVC pipe to build a simple frame.


I cut my fabric to fit the frame--plus a couple of inches for seam allowance and sliding on and off if needed.


I traced circles onto my main body fabric, showing where I wanted the holes to be.


Folded the material so that the circle was folded in half, and then cut out my circles...I cut a little bigger than my drawn lines.


Next, I cut 4 inch strips to make "bias" tape from...though I didn't cut on the bias.


Next, using your "hole circle" as a guide, cut four circles the size you want to cover the hole with (the door)...I made mine about an inch larger all the way around.


Cut your batting to match the "door" size.


Sandwich your batting between the front and back pieces of your door, and pin in place.


Sew a two short tubes for handles.


And stuff with the scrap pieces you cut off (or use poly-fil).


Quilt your batting and door covers in place.


Attach handles.


Iron bias tape pieces.


Make bias tape.


You will want four pieces of bias tape, one for each hole, and one for each door.


Pin bias tape in place,


And sew it to your hole.


Sew bias tape around your door as well.


Add the hinge to your door,


and attach to the face of your washer/dryer combo. (I mounted my doors to where they would close by gravity and I would not have to have velcro or anything to hold them closed, but it could be done either way.

Next, sew the other three sides on, creating a tube, and sew a square on for the top.


Here is what the finished product looked like. She absolutely loved it! I think in retrospect I would use a PVC pipe frame so that I could make it the size I wanted, but it worked very well this way, and I recycled my plastic thing with missing drawers.

I would love to know if you tried this tutorial, and how it worked out for you. (I assumed in the tutorial basic sewing skills...if you have any questions, feel free to ask).


Check out my link party page to see where I am linking.