Showing posts with label reuse. Show all posts

Friday, November 8, 2013

Stacked Washer & Dryer Tutorial


I made this a few years ago, but am just now getting around to posting the tutorial. My daughter had one of those plastic washer/dryer things to play with, but it was not functional and took up a lot of room. I created this one with the intention of using it as a laundry basket as well. You could put a mesh bag on the inside for laundry if you chose to use it that way.
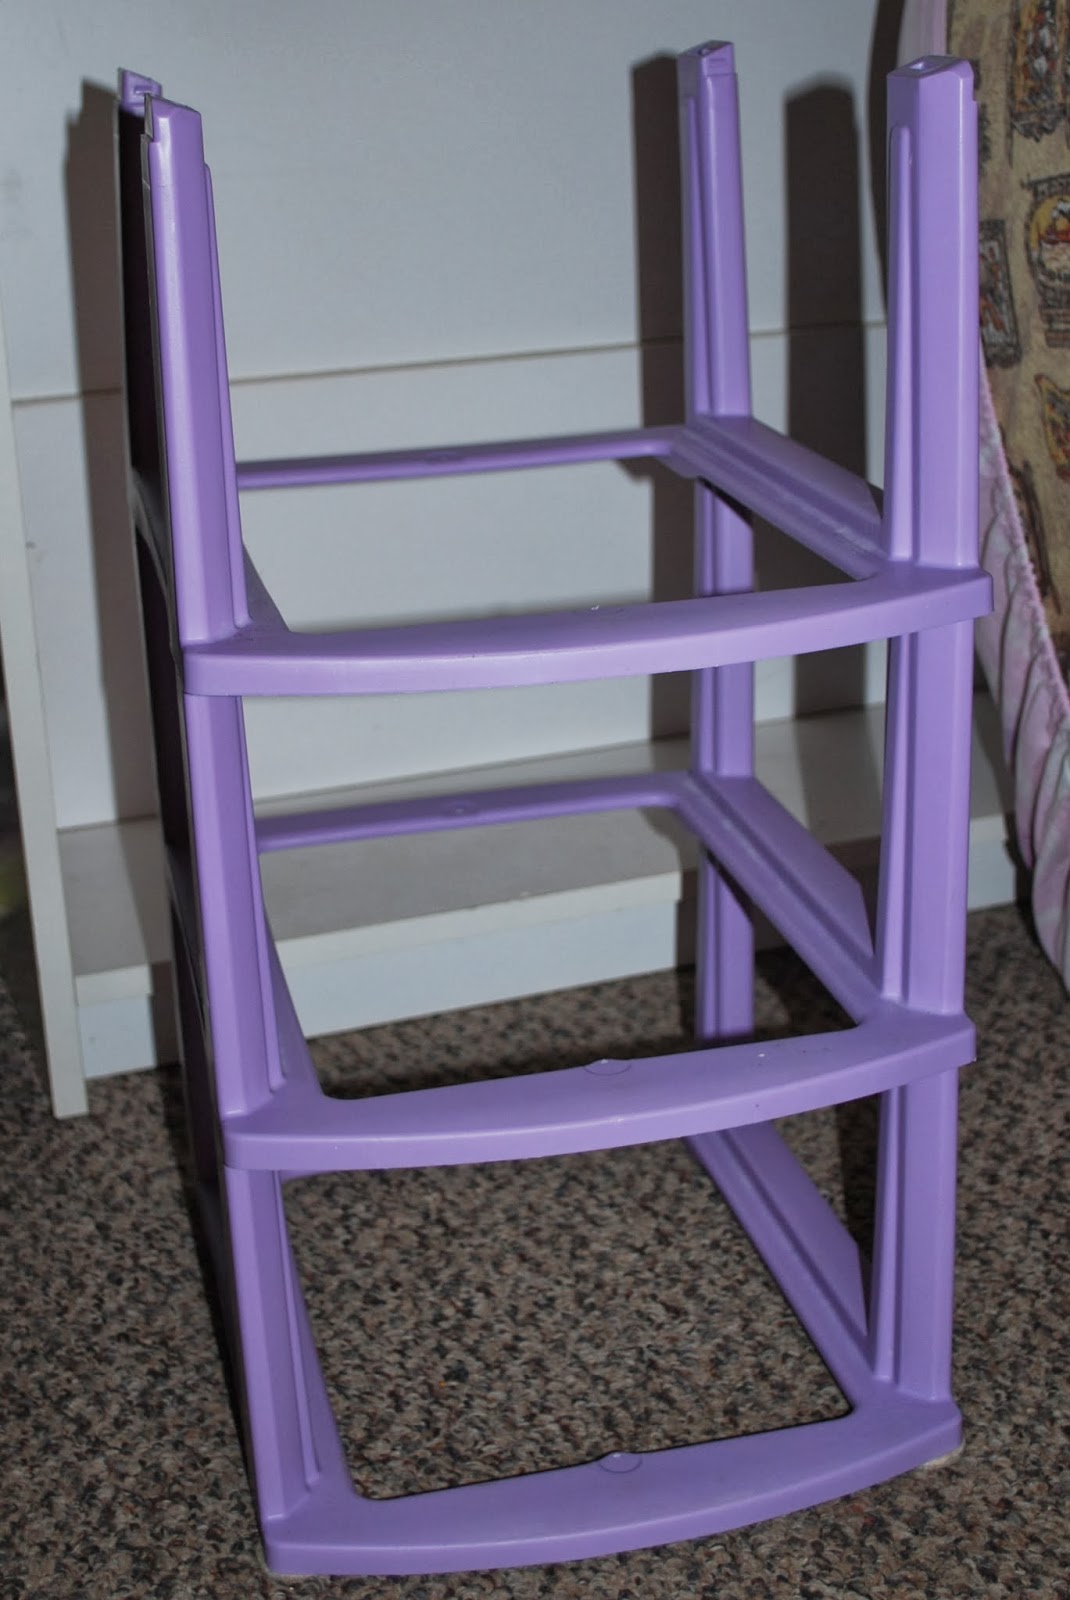

I started with this...one of those 3-drawer plastic things...minus the drawers. You could also use PVC pipe to build a simple frame.


I cut my fabric to fit the frame--plus a couple of inches for seam allowance and sliding on and off if needed.


I traced circles onto my main body fabric, showing where I wanted the holes to be.


Folded the material so that the circle was folded in half, and then cut out my circles...I cut a little bigger than my drawn lines.


Next, I cut 4 inch strips to make "bias" tape from...though I didn't cut on the bias.


Next, using your "hole circle" as a guide, cut four circles the size you want to cover the hole with (the door)...I made mine about an inch larger all the way around.


Cut your batting to match the "door" size.


Sandwich your batting between the front and back pieces of your door, and pin in place.


Sew a two short tubes for handles.


And stuff with the scrap pieces you cut off (or use poly-fil).


Quilt your batting and door covers in place.


Attach handles.


Iron bias tape pieces.


Make bias tape.


You will want four pieces of bias tape, one for each hole, and one for each door.


Pin bias tape in place,


And sew it to your hole.


Sew bias tape around your door as well.


Add the hinge to your door,


and attach to the face of your washer/dryer combo. (I mounted my doors to where they would close by gravity and I would not have to have velcro or anything to hold them closed, but it could be done either way.

Next, sew the other three sides on, creating a tube, and sew a square on for the top.


Here is what the finished product looked like. She absolutely loved it! I think in retrospect I would use a PVC pipe frame so that I could make it the size I wanted, but it worked very well this way, and I recycled my plastic thing with missing drawers.

I would love to know if you tried this tutorial, and how it worked out for you. (I assumed in the tutorial basic sewing skills...if you have any questions, feel free to ask).


Check out my link party page to see where I am linking.

Sunday, May 15, 2011

Noah's Birthday Gift

In my (extended) family, there are six birthdays in the month of May. Needless to say, May can be an expensive month if I attend every party (usually at a pizza place with games--more money), and purchase a present for everyone. This idea was born from having no wrapping paper for my nephew, Damon's gift. He had been sent a gift by a far away great great aunt, and it was my job to wrap it...with no wrapping paper. I had purchased a small gift that went along with hers, so I decided to put them all in one big bag. I found an old t-shirt and set to work making a bag out of it...then I thought, why not put his name on it and add a drawstring and it can be a present too!

Apparently the idea was a hit, because his cousin is now asking for one as well. The cousin's party is tonight and I had a little more warning, so I was able to plan his bag a little better. Here is what I came up with.

Ok, turn your head 90 degrees to the left--I really have to remember to turn these right side up next time.


I really like the way this turned out, and I wish that I had the time to plan out Damon's bag because I am afraid he will be a bit jealous now.

Here is a sneak peek at another project I am working on.

Tattered quilt.

This quilt was made by my grandmother. She passed away a couple of years ago, and my Dad gave the quilt to me to be used as batting for another quilt or something, but I know he would rather see it salvaged. Some of the blocks are beyond repair, but a few I was able to salvage and will be able to patch, but the batting is almost non-existent, and there is still much to be done. (It won't be the same quilt when I am finished, but will still showcase some of my grandmother's blocks). Stay tuned for the reveal!

Monday, May 9, 2011

My first tutorial! T-shirt dress

Today, I met my inner Marissa Lynch (of New Dress a Day fame). I decided to remake a couple of too-small garments belonging to my daughter. Read on to see what I came up with! I have never before written a full tutorial so this will probably be a little choppy, but here goes. My daughter had this dress which was way too short on her and getting too tight in the arms, but she really loved it and it was super comfy because it's made from t-shirt material...add to that, she had a shirt which she loved which was getting too tight all around...the colors coordinated pretty well so I decided to see what I could do to put the two together and come up with a wearable item--hopefully.

See the belly sticking out?

Too short and arms too tight.

First, I cut off the dress just below the waistline (this had a high waist or I would have cut above the waistline to make the finished product plenty long).

Off come the sleeves--since they are too tight anyway.

Snagged a little more of the dress material to sew into the sides of the shirt so the finished dress would not be too tight.

Cutting seams out of the sides of the shirt.

Pinning the pieces from the dress into the sides of shirt (these were a little long...I trimmed them later).

I took the original sleeves of the dress and created a little cap sleeve ruffle with them. I was afraid this part would not turn out well at all, but I liked it when I was finished.

Sewing on the cap sleeve.

Sewing down the sides.

Sewing the shirt and skirt together. (just turn one or the other inside out, and put the other piece right side out inside of the inside out piece--adding gathers where needed to make them fit together right--and sew together, then turn right side out.) I also added a neck ruffle and trim, but forgot to take pictures of the process.

Finished product! The ruffles look a bit off to me, and I wound up trimming a bit more off her sleeve ruffles after this picture was taken, but you can see--she loves it!

Not sure why she is winking, but I thought it was cute, and you can see a bit more of the pieces I added in on the sides.

Well, there it is, my first tutorial. Hope I didn't butcher too badly what I was trying to say/show. If you have any questions, please feel free to ask, and thanks for coming along for the (bumpy) ride today! (Also, check back often as I am planning to attempt to make 3 items per week and blog about each--totally wish I had time for a project a day...just not happening right now lol!)

Here are the places I am linking up today:


Make it Yours @ My Backyard Eden


Sunday, May 8, 2011

Finally SUMMER!

A couple of days ago I made a new item. I totally planned to blog about it right after I finished, but hmm, I don't know what happened...I think the summer lazies caught up with me. So anyway, I bought a big bag of material for $5 and in the bottom was some old upholstery samples...I decided to see what I could come up with that just used one sample instead of sewing them all together and making something. So, here is my before picture of what I started out with.


Zipper from the pants, two scraps from the bag I bought, and the upholstery sample.

I had also just purchased a zipper foot (finally!) for my sewing machine so I decided to test it out. Now I wish I had taken step by step pictures because at a couple of points I wasn't quite sure if it was going to turn out right or not. Here is the finished project (a change purse).


I also just created an Etsy shop this week, so the change purse and several of my other creations are available for purchase on Etsy at  http://www.etsy.com/shop/ScrappyBag?ref=pr_shop_more. Or you can search for ScrappyBag on Etsy.com.

Tuesday, April 12, 2011

My Newest Endeavor

I recently decided that I am never going to have enough "stuff" made up to fill a booth at a local flea market/ consignment shop so instead I have taken pictures of the things I have made up, and posted them on Facebook where my friends and family can take a look and purchase if they wish. My business facebook page is http://www.facebook.com/pages/Scrappy-Bag-Lady/197609710271550. I am making Sock Bunnies for Easter, and Rag Rugs, Purses and Hot/Cold Packs. Of course, much more to come, but for now I think that covers what I have listed. I also make Caprisun bags, Dog Chew toys, Coasters, Quilts, and Softies...maybe a few other things I can't think of right now.

Many of my products are made from recycled materials. I use old t-shirts, jeans, towels, bed sheets, new socks, new scraps left over from other projects; anything I can get my hands on. (Ok, so someday when I'm not a full-time student, I may get enough stuff to fill a small booth, but until then, this blog and facebook...and maybe Etsy will be my means of selling my items.)

Also as a side-note...once Summer starts and I am able to make the time for sewing, I plan to channel Marissa Lynch's idea from New Dress a Day, and attempt to make myself some new clothing from some things I have laying around. (I probably won't be doing this daily, but maybe New Dress a Week.) Hopefully I will create enough items to do a few give-aways as well. Looking forward to Summer!

Monday, October 4, 2010

Sunday's Post

Well, Sunday I couldn't get my computer to upload pictures to my blog, so here is Sunday's post...a day late.

At about 1:00am (Saturday night/Sunday morning) I finally finished the rug I have been working on intermittently for the last couple weeks. I think it turned out nice, but different from my original vision. The coolest thing about this rug is that it was truly made from scraps with the exception of the dark pink...that was a pair of scrub bottoms. The rest was all pieces that were less than 1 square foot, and most were actually odd triangle pieces or trimmings that I could only get one or two strips from, so the prep work took a bit longer on this one...but  it is more recycled too, because most of the pieces were too small for much else. I'll be looking to start another project tonight or tomorrow...hopefully a simple one so I can finish it in one day and feel like I've accomplished something. Well, here is a picture of my rug, and a one of our ride today.

My wonderful rug!

Getting ready to ride out.

It was pretty cold starting out and I couldn't find anyone to watch Munckin, so I wound up driving the van instead of riding my bike or riding with hubby. It was still a fun trip, but the directions and map were absolutely attrocious! 

Thursday, September 30, 2010

Remembering Rebekah

Well, I am not sure if I had mentioned it on this blog before, but I have a younger sister named Rebekah who lost her battle with cancer about a year and a half ago. Her husband is finally parting with some of her things, so I went to his house to pick out what I wanted before the yard sale starts tomorrow. I came home with 2 large totes full of yarn and fabric. As I went through all of those things, I realized again how much alike she and I are.

She had loads of fabric that had been picked up at yardsales (still had the masking tape and price on it), and several things it looked like she was planning to repurpose...like an old bedsheet and some curtains. She loved making handmade gifts for everyone, and she was great at it! I wish I could have shared with her when I found out how to make t-shirt yarn, and plarn...I know she would have loved reusing old things and making them new again. (Another thing I found was about 10 crochet needles in only 2-3 sizes...like me, she would misplace one and go buy another).

The other great thing about getting those boxes of her stuff, was finding her half-finished projects (she was working on several things). I feel like there is still a part of her wrapped up in that yarn (the part-finished things) because it is something she put work and love into. I am still deciding what to do with those projects though. I certainly will never unravel them, but should I try to finish them out?...(I don't even know specifically what she was making). Or should I just tie them off as they are and give them to her closest friends and family?

I have thoroughly enjoyed my evening of reminising and the glimpse of my Bekah that I miss so much. She was my best friend in the world, and I will never feel that I did enough to show her that when she was alive.

Friday, September 24, 2010

Hooray for sock creatures!

So...I made some sock creatures tonight (used real socks this time). Strangely enough, the "easy" patterns were the hardest for me to do. The bunny was my favorite...I will definitely be making more of him.

My adorable little bunny!

Side view so you can see his/her ears.

Squarish turtle.

Strange (but cute) fish.

Well, that's it for my creativity tonight. I'm completely out of ideas...for now. I think I will go put some of my rag rug material in a bag for tomorrow. I'm supposed to make an appearance at a 1st birthday party for a friend's baby, so a rag rug will give me something to do (especially since my hubby volunteered to show up early to help grill).